Showing posts with label recommendations. Show all posts

Friday, November 4, 2016

9 Tips to Banish Cake Face!


After a very rough month or so health wise and sleep wise, my face is in rough shape.  I did not wash and moisturize twice a day like I should have while I was sick and my skin shows it.  When your skin is dry, uneven, and full of dead skin layers, cake face is so hard to avoid!

Luckily I found a scrub and a face oil that really help! I can now actually salvage my poor skin and have my foundation apply smoothly without the dreaded cake face look.

Since I have been struggling with this and researching tips and tricks I thought I would make a post with all of the useful tips and tricks out there.  There are so many things you can do to help avoid cake face:

1. exfoliate (2-3 x's a week)
2. moisturize (2-3 x's a day)
3. add some oil to your foundation before applying (see demonstration here)
bonus tip: if you have dry skin or lots of texture to your skin avoid watery, or very thin liquid foundations. You can even put your skin type into Sephora's website and see recommendations for foundation based on your skin type)
4. apply foundation with a beauty blender or soft foundation brush
5. try to stipple (push foundation straight into your skin) instead of rubbing the foundation around your face
6. use downward strokes when applying foundation (peach fuzz generally grows downwards on your face and you want it to lay smooth and flat not stand it up)
7. make sure your foundation is completely dry before adding any finishing powder
8. press instead of rubbing powder in
9. use a glycerin, moisturizing setting spray

Thanks for reading!!  Sorry there are no pictures in this post, my camera lens is not able to pick up cakey vs. smooth makeup difference :(

post signature

Friday, January 30, 2015

Going Blonde!

In October I decided to try going BLONDE!  I found some amazing inspiration on Pinterest and decided I wanted something similar to this.

Source (original source unknown)

So I went to this awesome lady and we set out to recreate this color.  She knew I wanted to keep my hair as damage free as possible because I like to keep it long.  So when my color pulled red (due to how my hair naturally goes when it lightens and hormones due to breast feeding) we just went with what we got.

It was actually surprisingly very flattering with my skin tone and eyes.  The only problem was that sometimes it looked very blonde-ish orange instead of blonde or red or light brown.  I went in search of an awesome purple shampoo.  

Purple shampoos help blonde hair stay more cool toned and fight orange or yellow tones by leaving a touch of blue violet in your hair.  If your hair is very light blonde you need to be careful to use it once or twice a week or else your hair will start to look purple.  If that happens just don't use the purple shampoo again until it is all washed out and has started to go back to almost looking yellow or brassy.

So I choose my favorite shampoo at Sally Beauty Supply based on ingredients and smell read the review here.  I felt like it was helping, but it is a gradual change as it builds up.  A week or two after I started using it though my husband actually said that he thought the purple shampoo was actually working and that my hair was not as orange.  :)


The two left pictures were right after I had my hair done and the right picture is a few months later (obviously they are in very different lighting but my hair looks much more blonde in the right picture).

I am just about ready to go back in and we're going to have another try for more blonde and more like the inspiration, but in the meantime I have loved my new hair color.  :)

Thanks for reading!  Do you have a fun hair coloring story?  I'd love to hear about it in the comments below :)

post signature

Monday, January 26, 2015

Zit Fix! The 3 Best Spot Treatments

I have had acne off and on since I was about twelve.  Unfortunately it's been mainly "on" and very rarely "off."  I have tried so many different acne products both prescription and over the counter with little success.  There are a few products that are worth sharing though :)


If you have acne often or even if you only get a "spot" rarely, the best strategy may be just to treat each spot.  Often using a strong or drying product on your entire face will cause more harm than good.  These three use a variety of active ingredients to help you get rid of zits faster.


The first is Murad's Acne Spot Treatment.  This baby is $16 for a little tube that will last for a very long time.  It is very soothing and effective at reducing the swelling and pain of a zit while helping it heal faster.  Here are the claims straight from Sephora, "High performance ingredients, such as sulfur and salicylic acid, reduce the appearance of blemishes while supporting natural cell turnover. Zinc and licorice root extract help support natural healing. This product is dermatologist developed."  I just barely ran out of this and I will miss it.  The only downfall is that it is a little smelly due to the sulfur.


The second product is a glycolic acid acne spot treatment called the Zit Zapper from Perfectly Posh.  This is also a small tube with the same amount of product as the Murad treatment.  It also will last forever!  This acid is great for getting rid of the dead skin cell plugs and oil that causes zits, blackheads and whiteheads.  It can shrink some zits in a matter of hours!  The claim straight from Perfectly Posh "Aggressively exfoliates clogged pores to reduce duration of blemishes."


The third product is actually a mask but I liked it a lot better as a spot treatment as it was a little too drying for my entire face.  It is Proactiv's Skin Purifying Mask.  This product was great for making you feel like you were instantly shrinking and drying out your zit.  It also always made them heal up in about half the time that they would heal in without this treatment.  The mask uses sulfur, kaolin clay and tea tree oil to clarify skin and kill bacteria.  The claims from Proactiv "Containing sulfur medicine and kaolin clay, it draws out impurities, reduces excess oil, and keeps pores clear, helping prevent new breakouts. It also soothes and calms skin as it reduces redness, irritation and blotchiness."

These three have really helped me with my skin when I was desperate to fix a nasty spot or two (or three).  :)  I hope they will help you out too!

What are your favorite acne fixes?  I'd love to hear in the comments below!


post signature

Monday, December 15, 2014

Gift Guide 2014 for the Beauty Obsessed


I love all of the beauty gift sets that come out around this time of year!  There are so many affordable options for sampling high cost brands.  I found a few that really intrigued me, and that had high reviews, to put together this post.

Two years ago I bought a benefit gift set at a great price and I was so excited about it.  I actually ended up hating all of the products, but I was so glad that I was able to try them at well below full price.  After that experience I have started looking at reviews closer and trying to find products that will work for me.

All of the products above had high reviews :)

1. Too Faced Bronzer Wardrobe Collection $22 Sephora
This set comes with four bronzer shades, including two of Too Faced's famous chocolate bronzers and a brush for applying.  It has an average rating of 4.6 out of 5 stars on sephora.com the most common complaint is that the packaging is cardboard.  I don't really care what it's in as long as it is amazing :)

2.  Benefit The Real Steal $24 Ulta
The Real Steal features the cult favorites They're Real mascara and Push Up liner and They're Real remover, the liner has an amazing applicator for precise liner.  The set is rated 4 out of 5 stars on Ulta.com.

3.  Caviar Stone Bracelet $14 Vanity
I know this isn't technically a beauty item, but I wanted to include some pretty jewelry too.  This bracelet is from Vanity.com and I think it is stunning.

4.  EOS. A Ray of Holiday Sunshine Rachel Roy $6 Ulta
I can't get over this price for 3 EOS balms!  The trendy balm's moisturizing properties are up for debate in the review section, but they still earned a 4.5 out of 5 rating.  At this price it would be a great way to try them.

5.  Sephora Favorites Spray of Sunshine Fragrance Sampler For Her $24 Sephora
I read about what a great deal these samplers were over and over again last holiday season.  The set includes samples of multiple high end fragrances.  You use the samples and determine which is your favorite, you then turn in a card that is in the sampler for a rollerball of your chosen fragrance.  The reviews were favorable with the exception that you can only get the rollerball at a Sephora store that is not in JCP.

6.  Tarte Golden Days and Sultry Nights Amazonian Clay Collector's Shadow Palette $24 Sephora
The colors in this palette are so gorgeous!  They apply as more of a sheer shade and are not as dramatic as they appear in the palette.  The palette itself is gorgeous and contains full size shadows.

7.  Gem Stone Head Wrap $9 Vanity
This wrap has some nice chunky stones that would be gorgeous for any dressy look.

8.  Sexy Hair Voluptuous Volume $16 Ulta
Pump up the volume in your hair with Spray and Play hairspray and Root Pump Plus, this kit has a perfect 5 out of 5 stars rating with two rave reviews.

9.  Beaded Dream Catcher Earrings $7 Forever21
These are the most gorgeous earrings in my book!  They have beautiful details and are perfect mini dream catchers.  There are a lot of other pretty jewelry options on F21's site.

10.  Sephora Collection Bronzed and Blushing Face Palette $15
A large mirror and three decent sized powders come in this kit.  The blushes and bronzers are super pigmented and a little goes a long way.  This set has a 4.1 out of 5 star rating on Sephora.com.

11.  NYX Butter Lip Gloss Sugar Rush Set $10 Ulta
These lip glosses are very hydrating and non-sticky and come in three yummy flavors.  This set has a 5 out of 5 star rating on Ulta and the Butter Lip Glosses have a 4.5 rating.

12.  BareMinerals Beauty Obsessed $25 Ulta
This kit comes with trial sized eyeliner, mascara, bronzer and blush duo, and lipgloss.  The set has a 4.5 out of 5 star average rating on Ulta.com.

13.  Faux Crystal and Feather Pendant Necklace $5 Forever 21
I really like the look of these stacked single pendant necklaces that is trendy right now.  I also love the boho feel of the crystal and the feather on this one.

14.  Lorac Party Eyeshadow Palette $24 Ulta
This palette is so pretty!  The shades are super pigmented and shimmery.  Perfect for a party!  It is brand, spankin' new so there are no reviews on Ulta, but searching online I found a rave review and it was enough to convince me to keep it in this guide.

Do you have a beauty wish list this holiday season?  Let me know in the comments below.


post signature

Thursday, June 26, 2014

Review: Maybelline Dream Lumi Highlighting Concealer

4 out of 5 stars


Best uses:  Highlighting, concealing under eye circles while highlighting, matte finish highlight with no shimmer, sheen, glitter, etc.

Why I like it:  The wand is easy to use, it lasts a long time, it provides good coverage and a natural looking highlight, blends easily.

What I don't like:  If my skin is dry at all, this makes it look worse.

How I use it:  I like to apply it right along the lowest part of my under eye, you know that line or indent that goes from the inner corner of your eye, at an angle out and down, I put it right in that low spot and blend gently with my finger.

If I have more time then I will apply along the skin right next to the bottom of my nose, a little right down the center of the bridge of my nose, a bit on the tip of my chin and a wedge/triangle under my eye.


post signature

Wednesday, June 25, 2014

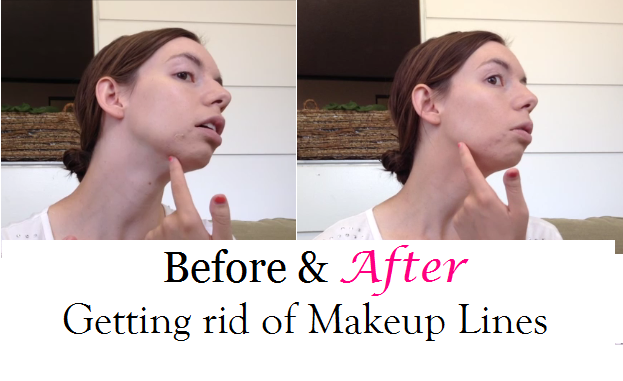
How to get rid of makeup lines

I struggle to get the right shade of foundation on the first try.  If I am way off I will see if I can exchange it.  I feel bad taking it back when it was my fault, so if there's anyway I can make it work, I keep it.

When picking a foundation, I go for the lighter shades because I know I am very fair.  I have found a slight yellow undertone looks much better on me than a slight pink or orange or cool undertone.  
I also have found that if I am having a hard time choosing between two shades, it is almost always better to pick the darker.  If the lighter shade looks like it might be lighter than your skin I wouldn't get it.  In the past when I have gotten a shade lighter than my skin, I look sickly.

If you get a shade that is close, but too dark, you won't look sickly.  You will have to do a little extra work to make the mismatch less noticeable though.
Here's what I do:
  • I apply foundation to my face
  • I take a little more foundation (not very much) and rub it from my jawline to almost halfway down my neck
  • You want this (on your neck) to be a very thin layer of foundation, so that you have a gradient between the bottom of your neck to your jawline.
  • Take bronzer and slowly build it along the sides of your neck, next to the front of your neck, but not right on the front, sweep it all the way to your collar bones
You want to be very sparing with your foundation and bronzer application to your neck.  You want to slowly build it for a natural look.

Here's a video of how I do it.


Thanks for reading!! 
post signature
P.S.  If you do like high end makeup, Sephora actually has a color matching machine that scans your face.  I have heard mixed reviews about its accuracy, but it's worth a try :)

Thursday, June 19, 2014

Make your cheekbones POP!

I follow Benefit cosmetics on Instagram.  They have some pretty cool marketing and their products always have the funnest names.  Yesterday they posted a tip called "the jelly doughnut."  You use illuminator around your cheekbones/apple of your cheeks and then put blush in the center of your "doughnut" and blend.


I tried it yesterday...Wow!  I have never had my cheeks look so sculpted and gorgeous.  These pics really don't do it justice.


Before (sorry it's so blurry)

Can you see the ring of shiny color on my cheek?

Ring and blush in the middle, preblend

The finished look!  I think this is easier and maybe even better than highlighting and contouring.
I used my e.l.f. all over color stick as my highlight because it is somewhat frosty.  I used my e.l.f. baked blush in rich rose to pack in the middle of my circle.  Then I blended the edges of the circle and the middle with the blush.


You've got to try it!  Thanks for reading :)

post signature

Linking up with: Fry Sauce & Grits, Makeup Monday

Wednesday, June 18, 2014

Bold florals + Bold stripes (plus some little sister fashion)


Last night/early this morning my little brother left home for the next two years to serve a mission for our church.  We thought he wasn't going for another two weeks, so it was a really crazy few days for my mom getting him ready to go.  We all got together as a family last night.  It was sad to say goodbye, but we are all very excited for him.  As I'm typing this, he is probably almost to Mexico City.

I wanted to share some pics of what I wore last night and also what my 9 year old sister wore.  She was wearing the cutest outfit and it was so well coordinated.  I'm sharing pics below.  She also took the first few pictures of my outfit.  :)

This skirt is actually from my friend's wedding.  Isn't it cute!  I thought the bold stripes in my shirt needed a bolder floral pattern and I love how it looked with this bright, bold skirt.  My other sister got me this beautiful blazer for Christmas.  It has a stripe print with a chunky white lace overlay.


See how cute!?  She's got this beautiful white tee with clear, iridescent sequin sleeves and a pocket, a super cute polka dot layered skirt, white leggings with lace on the bottom, and then sparkly shoes that match the shirt.  She put this together by herself!

Thanks so much for reading!!


post signature
Linking up with:  Because Shanna Said So, The Pleated Poppy, Style Elixir, Whitney Nic James, Trend Spin Linkup.

Thursday, June 12, 2014

Take a Trip Thursday: Packing tips and Hawaii Pics

Napali Coast Kauai

You know how some people have the most gorgeous, coordinated, well put together outfits when they travel?  I am not one of those people.  At all.  I have made a lot of packing blunders in the past.  I'm still not the perfect packer, but I thought I could share what I have learned so far. :)


1.  Plan ahead:  Waiting until the last minute results in grabbing many miscellaneous items that may or may not go well together.  I have learned this the hard way.  Also it is hard to pack the right amount when you are in a hurry.

2.  Plan multiple outfits with your pieces:  As you decide what pieces you want to take lay them all out and start putting together potential outfits.  You want clothes that you feel comfortable in and that work well together.  I am very bad at grabbing a bunch of my favorites and then finding out on the trip that I only can make a few outfits and that some pieces don't match with anything :(

3.  Dress for your activities:  Take your itinerary and decide, based on what you are doing each day, what you should plan on wearing.  You don't have to plan everything out to a T, but if you are going to be doing a ton of hiking (like we did in HI), you will want multiple outfits that work for that activity and less outfits for other activities.  

We brought old shoes for hiking.  Thank goodness!


Our trip consisted mainly of hiking with a side of driving and beaching :)


Waimea Canyon
4.  Bring at least one "fancy" outfit:  It is nice on vacation to go out to a nice dinner or do some shopping at least once.  It isn't as much fun when you feel like the frumpy tourist.

5.  Don't under or over pack:  I have decided that slightly over packing is better than under packing.  I tend to under pack, but I am getting better :)  Once again look at your activities and then how many days you will be gone.  Plan maybe one extra just in case outfit, but not three. :)


You can't tell from the picture but there is a nice swimming hole right here...


see we're actually standing up in this pic.


We hiked, waded, and kayaked to get to the swimming hole.

Maliuhi Road

Poipu Beach 


I bet you want to go to Kauai now ;)  It was a fun trip!

Thanks so much for reading!!  Comment if I should do a post about traveling cheaply.  Also if you have any packing tips I would love to hear them!
post signature
linking up with: BeYoutiful Link Party

Wednesday, June 11, 2014

Summer Style: Pink Striped Maxi Dress


hair how to


Dress: Connection 18 (TJ Maxx) ($15) / Denim Shirt: Forever 21 ($10 secondhand) / Shoes: Dollhouse ($14) (Ross) / Watch: Betsey Johnson (TJ Maxx) ($35) / Rosebud Earrings: Rue 21 ($5 in a set) / Hairstyle how to: here

Outfit total: less than $80

I got to go Birthday shopping with my mother in law this week.  We weren't able to go earlier because she was on vacation.  We found this dress and my watch at TJ Maxx.

I absolutely love this dress!  I love the color of pink it is and it is sooo comfy.  Striped maxi dresses are so gorgeous for summer.  They are so easy but look amazing!  Adding to the outfit with a kimono, blazer, or chambray top gives it a little something extra :)


I found as many similar items on Amazon as I could.  If you live near a TJ Maxx and want the watch, check to see if they have them.  They were only $35 in store and they are around $100 on Amazon.


**These are affiliate links, so if you choose to buy something from them, I will receive a small commission from Amazon, this will not affect the price you pay**


Thanks so much for reading!!  Comment below with your favorite summer clothes :)


post signature


StyleSessionsLogo zps1d35aa03 Style Sessions Fashion Link Up: Four Looks   Which Is Your Favorite?
link

Also linked with the Pleated Poppy link, the Penniless Socialite link, the trend spin link up with the Fashion Canvas and Walking in Memphis in High Heels, and the Real Arnolds link up.