Friday, July 20, 2012

Make the Old New Again: Nail Polish

There have been a lot of amazing nail polish colors on Pinterest and Youtube lately.  It makes me want to buy way too much nail polish that I don't need.  I've been getting bored with the colors I have, but the other day I decided to start layering them over each other to get new colors.  So far I am loving the results.

Here's the colors I currently have:


Many of them are a few years old.  If you have a nail polish that is starting to get goopy, you can just add a few drops of acetone nail polish remover to it and shake it up.  Typically this will make the polish almost as good as new again.


The first combination I have tried is this teal green with the sheer sparkly baby blue over top.


The results is this awesome turquoise color.  I think it actually has more dimension to it than a similar color from one bottle could ever have.


Here's a few other color combos I want to try:


The best way to do it is to put the more opaque color down first and then to layer the more sheer or sparkly color on top.  I want to try the lime green with the shimmery white on top, the pink with the sheer shimmery blue and the baby pink with the shimmery blue.

The two Sally Hansen polishes are the Hard as Nails in Frozen Solid 680, and Heart of Stone 230.  All of my other polishes are ones I have found at different odd ball stores, but they have worked great.

Tuesday, July 17, 2012

Vitamins: better in your face or on it?

Whenever I see skin products advertising all of the vitamins they contain and the hair and skin benefits, I think to myself, "yeah, but how much do they help you if you wear them.  Don't you need to eat them?"

I decided to do some research online to see if there was any scientific evidence that showed that vitamins could benefit your skin when applied topically.  I was surprised when I actually found out that the basis for adding vitamin C to skin care products was a Duke study that had found a reduction in sun spots on the backs of hairless pigs with application of vitamin C.

So to get great skin we need to not only get enough vitamins in our diet, but we can also benefit from vitamins in our skin care products.  Vitamins are very tricky though.  Many vitamins are light sensitive and easily oxidized with exposure to air.  Look for opaque packaging and for a container that minimizes the product's exposure to air.  I have heard many people criticize anti-aging creams that are in twist top jars.  The product may be potent with the first few uses, but with repeated exposure to air, becomes less effective.

Pool Day

Today I was lucky enough to go to the pool with my two sisters and my mom.  We had a lot of fun and were in and out of the water all day.

My husband said something about me having pool hair and I decided I wanted to try doing a hair treatment while he was out at fire training (he's a volunteer fire fighter).

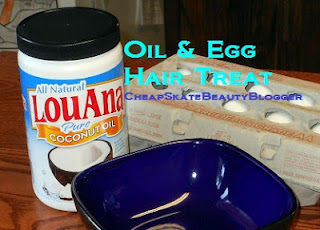
Here's the recipe for the treatment:

2-3 Tablespoons coconut oil
1 egg

I found this on Andrea's Choice on Youtube.  I really like her videos and trusted that this would be awesome, because she has amazingly gorgeous hair.

I put the coconut in the microwave on a lower setting to slowly warm it up and make it liquid.  You can also heat it in a small sauce pan on the stove.  Don't get it too hot, you don't want to cook your egg with the oil.

Once the oil was warm and melted, I just mixed the egg in with it.  I did this in the bathroom because applying the treatment is messy.  I sectioned my hair into two sections and applied it first to the ends and then to my scalp.

Then I scrunched it through all of my hair and put it in a messy bun on top of my head and used saran wrap to cover it.  This is supposed to help your hair hold in the heat and make the treatment work better.  I was just hoping it would keep the eggy stuff from dripping down my face, but I wasn't that lucky.

I feel like I will probably do this treatment again, but without the egg.  The coconut oil is supposed to be amazing for your hair.  Apparently the structure of the oil is very compatible with hair and is able to penetrate better than other oils.  I was getting grossed out by the mixture dripping down my face because of the egg.  I definitely will consider that before I do any other treatments with egg in them.

Back to the pool outing....

When I got home I was very happy to see that my mascara had not smudged or smeared at all and that my eye shadow also was mainly in place.

I am loving my Maybelline Define-a-Lash waterproof mascara this summer!  I would be hating it though, if I did not have my Pond's cold cream to remove it with.  I also, of course, love my trusty little Revlon eye lash curler.

Thursday, July 12, 2012

Coupons and Deals

I found a great site a few weeks ago called Mommy Savers.  They find coupons from Target and from manufacturers and share the best deals online.  For example: this week you can get Garnier Fructis Shampoo and Conditioner for $.99 each by following their links to print out coupons.  Super helpful for those of us trying to save money and still get great stuff.

Here's the link to them:

http://www.mommysavers.com/2012/07/target-garnier-fructis-shampoo-conditioner-just-99-each/

DIY Texturizing Beach Spray

Beach sprays have been all over Pinterest for a few months now.  I looked at a lot of different recipes and made one a few months ago.  I've used it quite a few times (actually more than I've used any other styling product) and have loved it.

Here's what I used:

Garnier Fructis Curl Sculpting Cream Gel
Neutrogena Triple Moisture Silk Touch Leave in Cream
Suave Professionals Men Styling Gel Firm Hold
Epsom Salts
Warm Water

Kind of random products?  Yes.  Did it work out great and smell amazing?  Heck yes!

The great thing about this is that it doesn't have to be exact and you can use what you have around the house.

An approximate recipe/formula:

1.5 Cups warm water
4-6 Tablespoons epsom salts
2-3 Tablespoons gel (I used a bit more because I used the             cream gel which is a little weaker)
2 Tablespoons leave in conditioner


I would recommend using this as a loose guide.  Obviously if you don't want super crunchy/salty hair, start with less salt and build up to your desired level.

I have used this a lot and have really liked it.  It smells great with these particular products and really texturizes my fine hair.  I have no natural wave or curl to my hair, so if I want wavy beach hair, I use this and then do loose curls with a curling iron after it is dry.  If I just want to make my hair look fuller for a certain hairstyle, I just put this in, scrunch it and dry it and then style it carefully, and my hair looks much thicker.  I would not try to comb through your hair after applying this, it gives lots of body and texture and is not good for sleek or non-messy styles.

Thanks for reading!!


Linking up with the BeYoutiful link up party!

Simple Geometric Nails

Today I borrowed some of my sister's new summer nail polishes and decided to use tape to make a simple, but fun, geometric nail design.  I used two Sally Hansen Hard as Nails Xtreme wear colors (Blue it, and Sunkissed) and one Petites nail polish in Passion Orange.

I used the orange (Sunkissed) as a base, let it dry, and then used tape to cover all but a triangle going across the tip of my nail.  I alternated the direction of the triangle on the nails and the colors that I used.  I had to try to make the tape less sticky or else it pulled off the base coat.  I then let them dry and painted with a clear top coat.

Here's the finished product (I'm sure anyone could do this and make it look better than I did, I'm not the best nail painter)


Tuesday, July 10, 2012

e.l.f. Free Shipping Haul


    I like to keep track of when e.l.f  is doing their different promotions and take advantage of the ones that save me the most.  Which is funny, because e.l.f. is so cheap in the first place, but I guess if you factor in shipping it does increase the price slightly.  Anyway, I put together an order the other day when I saw they had free shipping.  The order had to be $25 to qualify, so I picked just enough products to make it $26.

I ordered:

a dual pencil sharpener
two liquid lipsticks (brownie points and perfect pink)
clear lash & brow mascara
eyebrow treat & tame in dark
all over color stick in persimmon
HD powder in translucent
kabuki face brush
baked blush in rich rose
baked bronzer in St. Lucia

I ended up with almost everything I ordered and a cream eye shadow that I didn't.  I e-mailed them and they should be sending my missing baked blush and bronzer soon.  The customer service was great which was a plus after the skiwampus order missing two items and having an extra.  I have never had items missing from an order before and usually the extras were on the packing list as free samples or something.

I've tried everything that came and I am pretty satisfied with most of it.  I love the liquid lipsticks and the all over color stick.  I've used the color stick as blush and really liked it.  I don't apply the color stick directly to my face, but I run my finger over it until I get it warmed up and enough color on it and then I dot it along the apple of my cheek and angle up and out a bit from there.  I then blend it with a brush with a bit of powder blush on it (Maybelline FIT me! in light pink for now).

Brownie points is a great almost brownish lipstick/gloss.  Perfect Pink is like a pepto pink that doesn't show up as true on your lips as in the container, but I still like the look.  If you haven't tried e.l.f.'s liquid lipsticks, I really like them and would recommend them.  I think they're a great mix of color and gloss and they have a great texture and are slightly minty.

I am also happy with the clear lash and brow mascara.  I think it is very odd that the treat and tame came in the color it did.  I have very dark eyebrows, so I ordered the darkest shade and it is still a medium brown at best.  I have to be careful using it or else it looks weird.

I'm not really loving my kabuki brush.  It just feels very cheap (which it is) and isn't that big for a kabuki.  It might get a little more spread apart and loose as I use it, at least that's what I'm hoping.

I really am not loving the HD powder.  I got it in translucent, which is really white.  It goes on very white and needs a lot of blending and it still attaches to each little hair on your face.  It is supposed to give a soft focus effect that is photo friendly.  All I know is it is not in person friendly.  It also is not as fine as I feel it should be.  There are random grains in it that are pretty big.  Overall I think this is a pretty scary product and I'm not willing to go to the effort to very carefully apply it everyday.

DIY Translucent Loose Powder

Note:  This is not my wonderful concoction.  Credit goes to Cara at Maskcara.com

I stumbled upon this DIY a while ago, but I was kind of skeptical and didn't try it until I ran out of my other powder.  I ordered e.l.f.'s HD powder to replace my oat powder that I had been using and so far I have not been impressed...any-who...I decided I needed to try something different in the meantime.

The recipe for this is pretty simple:

Recipe: http://www.maskcara.com/2012/06/22/diy-eyeshadow-primer/

The post I was going off of said that the foundation was for color and was optional.  I think it's pretty important.  I didn't have very much leftover powder foundation to add to mine and I wish I had more, because the finished product goes on a bit more white than I would like it.  It's still so much better than my e.l.f. HD powder though.

I just pulled the plastic vent/lid thing out of my old mineral powder and washed out (and dried) the container.  Then I took about a tablespoon of cornstarch and dumped it into the container along with my powder foundation remnants.  I then put the plastic vent back in and twisted the lid on and shook it like crazy :)  Unfortunately my cap had a little chip in it...I got little bits of cornstarch all over me and a little on my bathroom too.

I wish I wouldn't have put the plastic part back in until after I had shaken it.  I now have a ton of product on top of the vents and it's not going back in very well and is kinda hard to use.  So learn from my mistake and just screw the lid on, shake, and then put the plastic vent back in.

Here's a picture of the ingredients and of the finished product...I tried to take pictures of the finished look with DIY primer and powder used, but my light was funny and it didn't turn out.


My Best Basics

    The foundation to beauty and any beauty routine is taking care of what you've got.  Here's a few of my favorite skin and hair products:
 In the hair products I have TRESemme Climate Protection conditioner, Aussie 3 Minute Miracle deep conditioner, Garnier Fructis Fortifying Shampoo Sleek & Shine, TRESemme Tres Two Spray, and Aussie Sprunch Spray.
The face products I have are amazing :)  I have Aveeno Positively Radiant Daily Moisturizer with SPF 15, AVON Solutions Cleanse Complete Balance, Pond's Cold Cream, and Equate Complete Beauty Lotion for sensitive skin with SPF 15 (compare to Olay Complete SPF 15).

Out of all of these products my absolute favorites are:

Pond's Cold Cream-it is an amazing make-up remover.  It is so gentle and works so well.

Aussie 3 Minute Miracle-this stuff really is miraculous.  I have really long hair and this really helps me keep it moisturized.

AVON Solutions Complete Balance Cleanser-this is a gentle, but very effective cleanser.  I have very acne prone skin and this stuff works really well to balance out my skin and is very affordable.  It's great for those with oily skin that still gets dry.  It has a really nice cooling/mintyness to it.

Garnier Fructis's Sleek & Shine Shampoo and Conditioner-these are both amazing.  Once again I have really long hair and I have to try to take good care of it or else it is a mess.  These products are very moisturizing and very affordable.

Equate Complete Beauty Lotion-So cheap!  Works just as well as the Oil of Olay version as far as I can tell.  I also love that it's called Beauty Lotion.  SPF 15 has worked amazingly well for me, I have burnt my arms and my neck a few times this summer on accident, but my face is always safe, because I use this every day.

DIY Eye-shadow Primer

Note: this is not my invention.  Credit goes to the amazing Cara at Maskcara.com  I wanted to share my experience with this D.I.Y.  Follow this link to get the recipe: http://www.maskcara.com/2012/06/22/diy-eyeshadow-primer/

I stumbled across a blog post this morning on how to make your own eye-shadow primer out of chapstick, corn starch and liquid foundation.  I ran out of primer a long time ago and haven't bought any because I can't find a cheap primer that works well.  I made it this morning and put it on before putting on my e.l.f. mineral eye-shadow.  After being in and out of the heat for hours it is still in place and hasn't creased!


I first started mixing it with a little butter-knife spreader thing from my kitchen, but then found that a clean finger worked much better because then you can mash the chapstick lumps into the formula.  The heat from your finger also melts the chapstick a bit and it just mixes much better.


Monday, July 9, 2012

Intro to Cheap Skate Beauty Blogger

     I have loved reading about DIY make-up and beauty since I was in the fifth grade.  Magazines and beauty blogs with make-up tips have been my favorite time wasters for quite a while.  But I was born into a very frugal family and hate to spend much money on beauty products.

     I am going to try to share great things that I have found and am learning about how to find and make great beauty products cheaply.  I get frustrated with both cheap and expensive products that I feel don't work, but I get at least as excited when I find great cheap products.
     

    This blog will showcase and review the good, the bad, and the Beautiful :)