Friday, May 30, 2014

Fashion love Friday


There are a few fashion trends going on right now that I am in love with.  Florals and stripes, cuffed jeans, boyfriend jeans and blazers and graphic shirts with feminine skirts.  Here's some pics of my faves and myself rocking the blazer and cuffed boyfriend jeans.

florals and stripes

source click here

H&M blouse - Zara skirt - Mango belt
source click here


A lot of these outfits are so amazing because of their contrast.  Graphic tee with a gorgeous skirt, blazer with loose cuffed jeans, whimsical floral with structured stripes.  Dig through your closet and see what you can do with what you've already got. 

 I have a lot of beautiful floral skirts, but might pick up a striped shirt like the ones pictured above, I did have a pair of baggy jeans and a blazer already :)


Thursday, May 29, 2014

5 minute wavy curls!


I never have time to curl my hair anymore.  I think I have curled it twice since Jackson was born.  We had a wedding to go to on Saturday and I knew I didn't have time to curl my hair...but I really wanted to.  

So I tried just taking really big sections and curling them...and it worked!  I was able to curl all of my hair in 5 minutes!!  It was curlier earlier, but I am out of hair spray...so this is what it looked like at about 4:00 P.M. and I curled it at 8:30 A.M.


What you need:
  • a brush/pick/comb
  • hair spray (this helps a lot)
  • 1" curling iron or wand
  • clip to hold sections (optional)


How to do it:

  • pull your hair back at your crown from your temples back to the back of the top of your head
  • this section should be about the size of a quarter to a half dollar
  • wrap it around your curling iron or wand, hold it on there for about 30 seconds or until the hair on the outside feels warm
  • start gently unwraping the end, and let the rest slide off the iron into you cupped hand (don't let it fall down straight yet) hold for a few seconds as it cools, let it down, hair spray
  • put your hand under the bottom of the curl and lift it back into a coiled spring again for a few seconds while the hair spray dries then let it down and move onto your next section
  • take the section to the right or left, the hair from the front side, behind your ear and almost to the back of your head, wrap it, curl it, and hairspray as before.
  • do the opposite side the same way
  • do whatever hair is left in the back


Voilla!  Curls in 5 minutes! 

If your hair is thicker you may have to do one more section, but probably not because my side and back sections were smaller than the first one and with thicker hair you would have more in those sections.


Thanks for reading!!

post signature


I'm sharing this with...

Wednesday, May 28, 2014

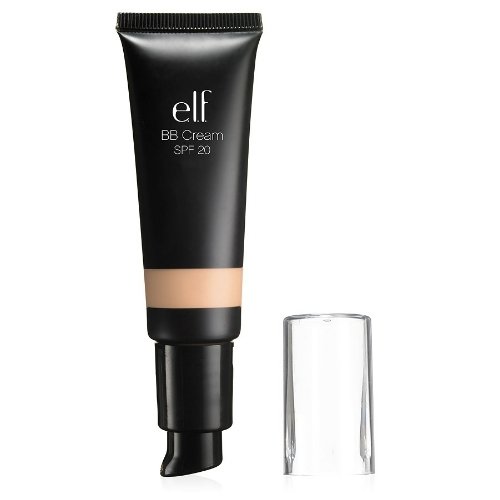
Makeup Review: e.l.f. BB Cream

4.5 out of 5 stars


Best uses:  everyday natural look, medium coverage.

Why I love it:  

This has the best coverage of any BB cream I've tried.  If you have acne prone skin or other imperfections you want to cover, this is the BB cream for you.  I also love that this does not dry out my skin and lasts all day.  It has a natural, somewhat dewy finish.

How I use it:

I use about 1.5 pumps and use my fingers to apply all over my face.  If you want to you can set it with powder.


post signature


Monday, May 26, 2014

Hair Product Review: Nioxin System 2, Cleanser, Scalp Treatment, Scalp Therapy (fine hair visibly thinning)

4.5 out of 5 stars


Best uses: 

making thinning/fine hair appear thicker, helping thinning hair regrow.

Why I love it:  

After I had my little boy, I started losing a ton of hair, which is normal, but I lost it and lost it and lost it for months.  I don't think that is normal.  Whenever I pulled my hair back you could see a ton of scalp in the front :(.  I felt so ugly and bald.  Ulta had this trial kit on sale for $19.99 and a $3.50 off any purchase of $10 or more coupon, so I decided to try the full system.  It helped give the hair that I had a lot of body and within a month I had a lot less scalp showing when I pulled my hair back.  Now my hair is pretty much back to its normal self at the roots, which is amazing, because it really was so thin and noticeably patchy.

How I use it: 

I got my hair really wet, lathered the Cleanser then applied it to my scalp and massaged it around well and then rinsed.  I applied the Scalp Therapy (conditioner) from scalp to ends, massaged a bit and let it sit for about two minutes, massaged a bit more and rinsed.  After I got out of the shower and had wrung my hair out (gently) a few times, I pumped 2-3 pumps of the Scalp Treatment into my hands, rubbed them together a bit and then applied to my scalp and roots like mousse.  I concentrated more on the areas around my forehead and temples because that's where my hair thinned out the most.

I ran out of the conditioner a while ago (that always happens) and so I still use the shampoo occasionally and try to remember to use the Scalp Treatment almost every time I wash.


post signature

Friday, May 23, 2014

Favorite things Friday

"Girls in white dresses with blue satin sashes, snowflakes that stay on my nose and eyelashes...These are a few of my favorite things!"

I hope you sang that in your head as you read it :)

So beauty wise my favorites lately are...


  • Tangle Teezer- I really wasn't sold on this at first, but now I love it.  There must be a learning curve or something
  • Nioxin Scalp Treatment for fine hair visibly thinning- I will be writing a full review on the full system next week.  This stuff helped me go from balding to back to normal hair.
  • e.l.f. Studio Eyebrow Kit- Read my full review here.  This stuff is amazing!!  (and so easy to use)
  • e.l.f. Luscuious Liquid Lipstick in Cherry Tart- I love the smell, formula, and color.  You do have to reapply about every two hours or so, but it's gorgeous and only a dollar.
  • Rosebud stud earrings- I got these in a multipack from Rue 21.  Super affordable and I love wearing them with everything.

Okay now for my favorite thing in life.  My little, happy family.  Complete with the cutest little baby boy and the best daddy and husband I've ever seen.  My hubby works more hours then most anyone and still does basically all our laundry, watches baby boy while I work, and does basically all of the yard work, oh yeah and he cooks better than me and much more often lately.  (in my defense I do hold and play with the baby while he cooks, otherwise he wouldn't really be able to).


Sorry there's really bad shadows in this pic, but it is one of my favorites of us as a family so far.  This was on the Angel's Landing hike in Zion's National Park.


And because I am a proud mama and can't resist...here's some massive cuteness.


He is my little angel :) and my very favorite of all.

Thanks for reading!!


post signature

Thursday, May 22, 2014

Eye Makeup Review: e.l.f. Studio Eyebrow Kit

5 out of 5 stars

I have to start this review out by saying I love, love, love this product!  I can actually make my brows look good with this and it is so easy!  If I can do it anyone can ;)

Best uses:

making you eyebrows look amazing!, filling in sparse areas of brows, emphasizing eyebrows to enhance your overall look either for everyday or for special occasions.

Why I love it:

The gel is super easy to use with the little applicator.  My brows get sparse from my arch out to the ends and they're scraggly at the ends.  I can use the gel to fill in and create direction at the ends of my brows.  The powder then just darkens my brows and makes them look thick and dark in a very good way.  Overall this makes my makeup look soooo much better than it did before I found this product.  Your brows really help your look come together.

How I use it:

I take the gel and do small strokes with the thin end of the brush anywhere I want to add more eyebrow "hairs."  I keep it within the bounds of my natural brows and do short small strokes to make it look natural, if I do accidentally go a bit overboard, it wipes off easily with a q-tip and can be re done in that area.  Then I take the fluffy end of the brush and put some powder on it and apply in strokes along my brow in the direction of growth.  I go up and out in the middle half of my brow, then down and out on the top half after my arch and up and out on the bottom half after my arch.  


Thanks for reading!!  You really should try this!!


post signature

Wednesday, May 21, 2014

Hair Product Review: Alba Botanica Natural Hawaiian Shampoo Body Builder Mango & GIVEAWAY!!

4 out of 5 stars

**Giveaway will close on Wednesday 5/28/2014**


The Review:

Best uses: 

Volumizing shampoo & conditioner for fine hair, light shampoo & conditioner for healthy hair, inexpensive pick for those looking for products without animal testing, parabens, artificial colors, pthalates, sulfates, and that have 100% vegetarian ingredients.

Why I love it:

This did a great job of giving my hair a lot of body.  It was not weighed down at all while I was using it and it kept my hair healthy.  Also even those it is sulfate free, the shampoo does still lather, which I think makes for easier use.


How I use it:

I really soak my hair and let it sit for a minute then get some shampoo in my hand and lather it.  I get my hair wet again right before I massage it into my scalp.  I don't like to shampoo my ends unless they have product in them (which is not common for me).  I make sure I've massaged it all along my scalp and then rinse and gently wring my hair out.  Sometimes I wait a minute so that my hair is not so saturated with water before I apply my conditioner.  I apply the conditioner from root to ends, I massage my scalp a bit and also like to comb through my ends a bit with a wide toothed comb to make sure the product is distributed, but you don't have to do that.  I like to let it sit for about two minutes and then rinse with water that is on the cooler side of warm, not cold and definitely not hot.

Note: If your hair is damaged, you can still use this product, but I would use it twice a week at most as it is not very moisturizing.  Also make sure you are doing deep conditioning about once a week when using this product, whether you have damaged or normal hair.


post signature


THE GIVEAWAY:

To earn entry, follow my page on facebook, click the link here.  You can earn additional entries for following my blog (4 entries) and commenting on a post (2 entries), following me on Pinterest, here, or on Instagram, 1 entry for each.


Thank you so much for reading!!  Have you tried sulfate free hair products?  Do you see a difference in your hair?  Share your experiences in the comments below.

**Sorry but this will only be open to those in the US due to shipping cost**

We have a winner!!  Brittany!!   I'll be contacting you to get you your prize :)


a Rafflecopter giveaway

Tuesday, May 20, 2014

Bridal Shower Bucket


One of my hubby's best friends is getting married next week.  We've known him since high school and he and his bride have been dating for over 3 years now.  We are so excited for them!

I went to her bridal shower with his family on Saturday.  His mother makes the best food!  She made the cutest little sugar cookies, little drinks complete with color coordinated bendy straws, croissant sandwiches, and fruit kabobs.  Mmmm!

The last 3 bridal showers I have went to, I have given them some homemade laundry detergent along with other useful things.  Big storage totes are always useful, and they make a great "bucket" for smaller gifts.  Go big or go home!

Step 1:  Get your "bucket"


I bought my tote at Shopko.  I get the biggest one I can find that's around $10.  This time I got this grey tote with green latch handles by Sterilight for $12.50, I believe it was 16 gallons.

Step 2: get smaller useful things to put in the bucket.


I decided to do some quick dinner items.  I wanted them to have something for those nights when you don't have much time for dinner and didn't plan ahead, but you don't want to go out.


I got: a jar of spaghetti sauce and spaghetti noodles; a jar of alfredo sauce, fettucine noodles and a can of chicken; and peanut butter and jelly. 

 I also made them some homemade laundry detergent.  I used a clean empty pickle jar and painted the lid with krylon and made a cute "laundry sprinkles" label with instructions on it and then filled it with the laundry detergent.  The lid is super sparkly and shiny :)

Step 3:  Wrap it up!

Next use a few beautiful wedding/bridal shower bags and group things together and place them in the bags with tissue paper.  You can get super creative and write a cute note, saying or instructions with each bag.

A few examples with the items I used: "You guys go together like peanut butter and jelly."  "One without the other is like spaghetti without sauce, fettucine without alfredo," etc.  I ran out of time to do the sayings, but the gift looked much better with them grouped and wrapped in pretty bags.
This is a great way to do a gift on a budget that is still very useful and does not look or seem cheap.  With a gift like this it's the thought that counts.  This gift (to me) says, "here, lets make your life a little easier."


I was really happy with how it all turned out.  Sometimes when you try to stick to around $20-$25 you kinda feel like your gift is lacking.  That's why I love starting out with the big tote and then adding themed items to it.

Thanks for reading!!


post signature


I'm linking up with these lovely ladies.  Click here to check it out!


Monday, May 19, 2014

Eye Makeup Review: e.l.f. Smudge Pot Cruisin Chic

                                                                               4.5 our of 5 stars


Best uses: 

easy eye shadow, day or night, natural eye look.


Why I love it:

I am really not an eye shadow person.  I have hooded eyes so it is hard to even tell whether I have eye shadow on most of the time, so I feel it's a waste of my time.  This is so quick and easy to apply and it makes a noticeable difference.  It is smooth and creamy, I absolutely love the color, it is buildable and multidimensional.


How I use it:

I apply elf's mineral eye shadow primer first and let it dry.  Then I use my finger to apply the smudge pot.  I begin applying close to my lash line, in the middle of my eyelid, and then smudge to the inside and outside corner and also work it up to my crease.  I then move to my other eye and do the same.  I like to apply a second layer to my whole lid or just to my crease.  This intensifies the shadow.  Sometimes I also apply a little, with a small brush, to my outer lower lash line.


Thanks for reading!!

post signature


Link party at Agape Love Designs here

Makeup Monday


Friday, May 16, 2014

Five reasons it's a Fantastic Friday!


First of all...here's the song of the day for this beautiful Friday.


Second of all...here's something to be thankful for.

Sometimes I forget how much I have to be thankful for and how amazing even the simple things are.  I think we get a little too caught up in "keeping up with the Jones's" a lot of the time and forget to focus on what is really important.  I'm so much happier when I realize how much I have been blessed!


Third of all...here's something I'm super excited for.

It's called Bright Night Event.  "An ALL day ENERGETIC retreat for ALL women" complete with "An Amazingly Epic Rooftop Dance Party with a slammin' DJ!"  My friend Alexis found this gem on instagram and told me how fun it was going to be.  
It's kinda expensive and I really am a "cheapskate" but then I realized I could use part of this money to pay for it and not feel guily. :)


Fourth of all...here's something beautiful.

All of the flowers in our front flower beds and the ones we're about to plant.  I really love flowers.  They are so beautiful!


Fifth of all...here's something you could win today!

Physician's Formula has some of thee best drugstore makeup out there.  They are doing this contest just today and are giving out 500 full size prizes.  Click here to enter.


Thanks so much for reading!  I hope you have a fabulous Friday!!


post signature

Thursday, May 15, 2014

Travel Diary: Peru trip and what makeup I packed

About a year ago Steve and I went on a two week trip to Peru.  We squeezed as much as we possibly could into those two weeks and it was amazing!

I wanted to share some of our awesome pictures and do a post about what I packed in my makeup bag.  We only took carry-ons because we ended up traveling by bus some nights and not having a hotel room to keep our stuff in some days.  We packed the bare minimum and packed empty bags to bring back souvenirs.

I packed:

Foundation: Revlon Colorstay the dry skin version
Powder: DIY cornstarch plus powder foundation
Blush: NYC Mosaic Face Powder Pink Cheek Glow
Eye liner: Avon Glimmer Sticks (a dark brown color, I don't know the exact name)
Mascara: Maybelline Define-A-Lash
Eye lash curler: Revlon


Now onto the fun part...


Our first destination was a city called Cajamarca.  It is up in the Andes in northern Peru.  It's kinda off the beaten path so we got there from Lima in this little prop plane.  It was super noisy and tiny inside.


Cajamarca is famous in Peru, at least northern Peru, for its dairy products.  The ice cream was amazing and so was this caramel milk stuff called Manjar.  It was so good!  We actually bought a bunch and took it to the people we visited later on in the trip.


This was the first site we went out and visited.  There were so many of these tombs carved into this rock face.  We rode in a combi up to this site, it was basically an old van that they take around to certain stops along a route.  A lot like buses here.  We were there before Carnival so there were water fights going on throughout the city.  One water balloon made it through the window of the combi and soaked another passenger.


This was the next site we visited.  We hiked through these rocks and then through a few amazing valleys.


Steve's mom and I on top of some of the rocks that were climbable.


There were some water paths made before the Inca at this same site.  They were carved very precisely and were still intact.


I think they said these were some sort of sacred writings along the water way.

I have thousands of pictures from this trip, and a lot I would like to share, so I will have to do a few more posts later.

Thanks for reading!


post signature